 If your wood deck looks faded, splintered, or simply tired, Deck Crown offers a premium, self-adhesive vinyl covering that transforms it in a single weekend—without demolition, permits, or the high cost of a full rebuild. But timing matters. The best results come from planning your project around weather, temperature, and the seasons when you want to enjoy (or protect) your outdoor space.
Deck Crown bonds directly to structurally sound wood boards, features a patented drip-edge that keeps water out, and resists stains, mold, mildew, and fading. With minimal ongoing maintenance and a 10-year warranty, it’s a smarter alternative to annual staining or a $15,000–$40,000+ rebuild. The key to success is installing on a dry day above 50°F.
Why Timing Matters for Deck Crown Installation
Unlike traditional deck stains that can be applied in a wider temperature window, Deck Crown’s self-adhesive technology performs best under specific conditions:
- Temperatures above 50°F for strong, lasting adhesion
- Completely dry deck boards (allow 24–48 hours after power washing)
- No rain expected during or immediately after installation
- Structurally sound boards and framing
Planning ahead ensures materials arrive in time, your deck is properly prepared, and you hit the ideal weather window. Many homeowners discover that installing Deck Crown is easier and faster than they expected—often completed in a weekend—once the timing is right.
The Best Seasons to Plan and Install Deck Crown
Late Spring: Ready for Summer Enjoyment
Spring is the most popular time for a reason. Temperatures reliably climb above 50°F, dry days become more common, and you get an entire season of barefoot-friendly, maintenance-free outdoor living. Renovate in a weekend and host gatherings all summer long. Start measuring and ordering in late winter or early spring so you’re ready the moment conditions are ideal.
Early Fall: Protect Your Deck Before Winter
Early fall is an underrated but excellent window. Install before consistent cold and wet weather arrives. Deck Crown’s patented drip edge helps shield the wood underneath, significantly reducing the winter prep chores required for bare wood decks. A practical pre-winter schedule:
- Six weeks before first snow: Inspect structure and decide to cover with Deck Crown.
- Four weeks before: Clean, dry, and install on a dry stretch of milder days (above 50°F).
- Two weeks before: Store cushions, move planters, and clear gutters.
After installation, winter care is mostly inspection, sweeping, and careful snow removal with a plastic shovel.
Winter and Summer Considerations
Winter is generally not ideal for installation in most climates due to temperatures below 50°F. However, it’s the perfect time for planning—measure your deck, choose colors (Cape Cod, Cedar, Red Wood, Stone, Timber, or Weathered), order materials, and schedule the work. Summer can work if you catch dry days above 50°F, but heat and higher humidity sometimes make spring or fall preferable.
Step-by-Step Planning Timeline
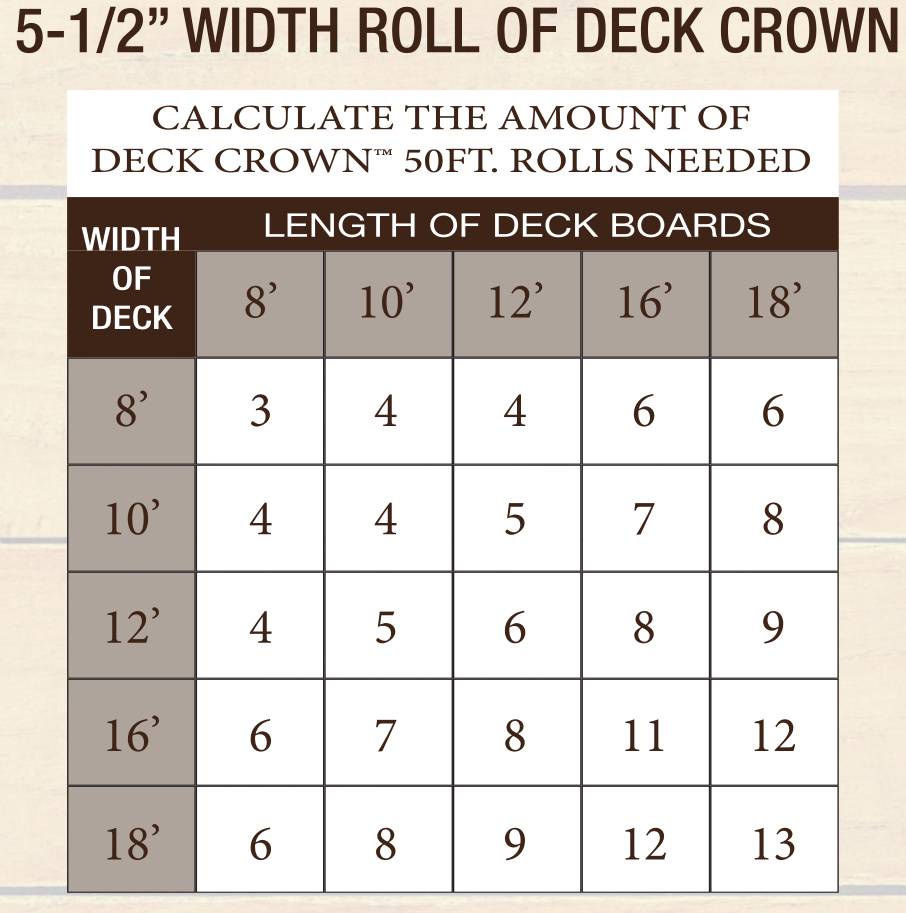
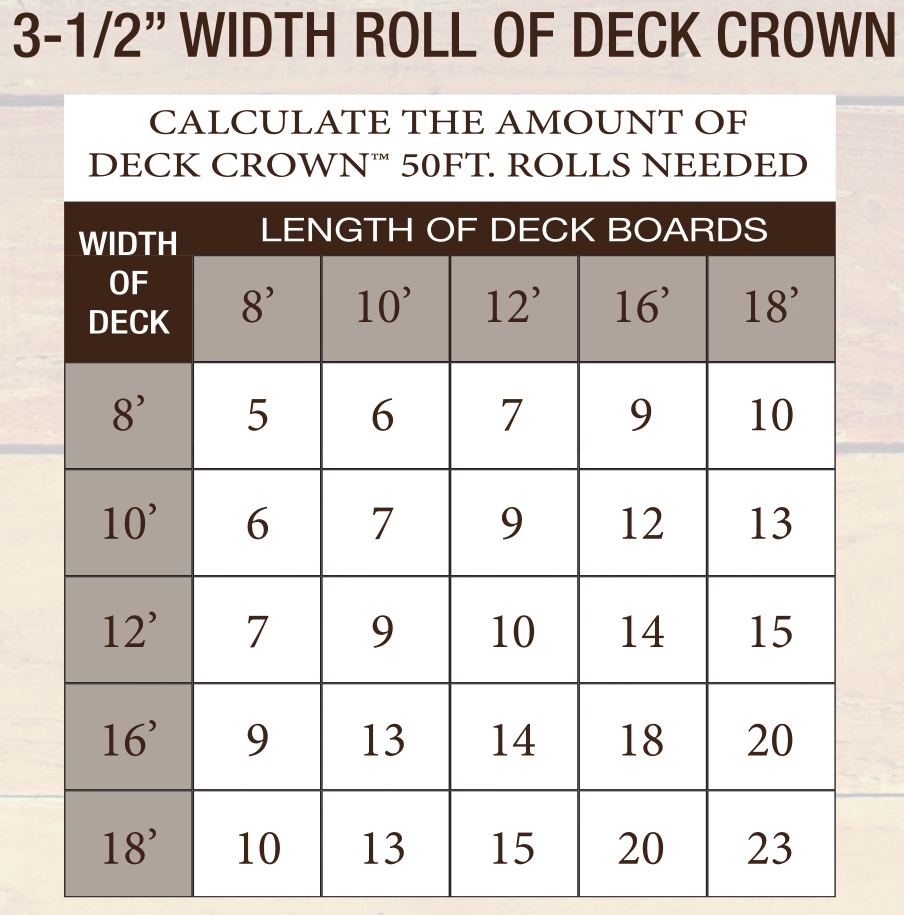
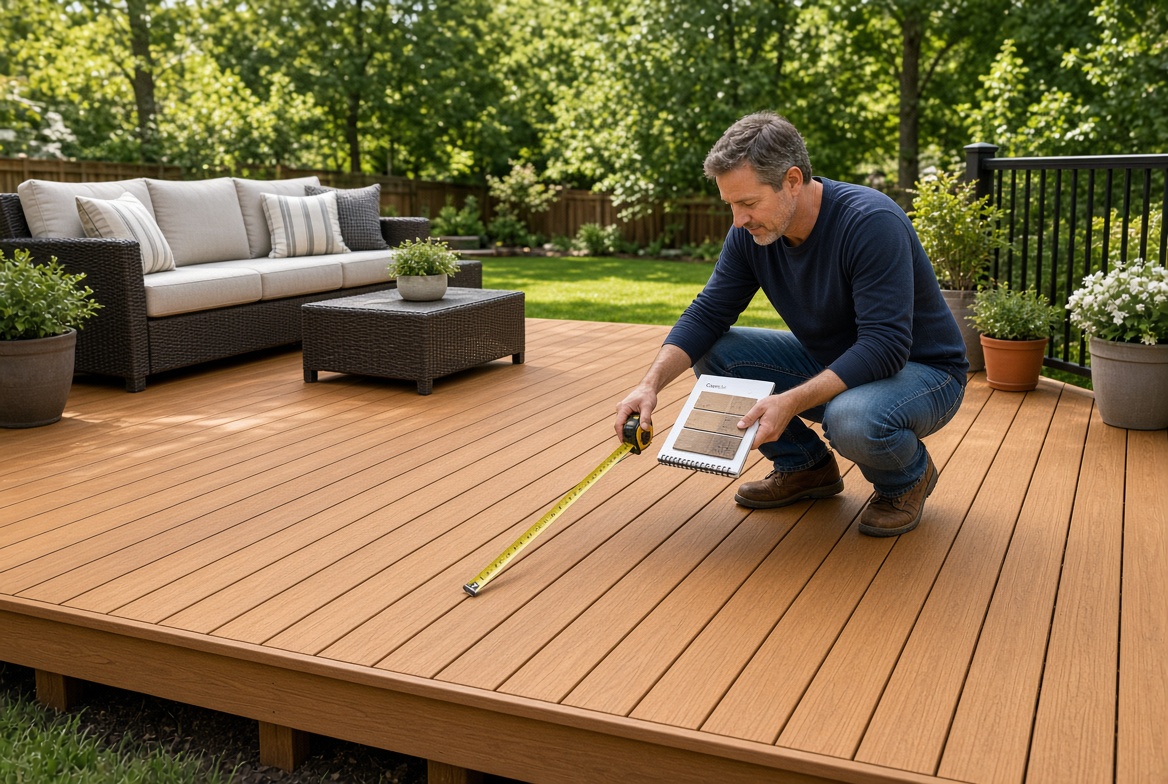
- 4–8 Weeks Ahead: Walk your deck and confirm it is structurally sound. Measure boards or total area. Use the Deck Crown calculator on deck-crown.com to determine how many rolls or kits you need. Order matching edging for stairs and edges if desired.
- 2–4 Weeks Ahead: Power wash the deck to remove dirt, old stain, and mildew. Allow 24–48 hours of complete drying. Tighten loose screws, replace any severely damaged boards, and sand high spots for a flat surface.
- Installation Day(s): Choose a dry day above 50°F. Cut the vinyl to length, peel the backing, and press firmly onto the boards. Use a roller for best adhesion. Work in sections and install matching edging.
- After Installation: Your deck is ready to use. No sanding, staining, or sealing is ever required again. Occasional sweeping or hosing is all the maintenance needed.
Deck Crown works on most existing wood decks (pressure-treated, cedar, redwood, etc.) and even older composite boards, as long as the structure is solid. It’s made in America and available with DIY support or help finding a local installer.
Key Benefits of Planning Your Deck Crown Improvement at the Right Time
- Strongest possible adhesive bond thanks to ideal temperature and dry conditions
- Deck ready for peak summer use or protected through winter
- Avoid contractor backlogs and premium spring/summer pricing associated with full rebuilds
- Save thousands compared to tearing out and replacing the entire deck
- Enjoy a splinter-free, stain-resistant, fade-resistant surface for years
Frequently Asked Questions
What is the best time of year to plan and install Deck Crown?
The ideal times are late spring (to enjoy your renovated deck all summer) and early fall (before consistent cold and wet weather). Installation must occur on a dry day with temperatures above 50°F for the best adhesive bond.
What temperature is required for Deck Crown installation?
Install Deck Crown on a dry day with temperatures above 50°F. This ensures the self-adhesive bonds properly to your structurally sound wood deck boards. Avoid installation during rain, high humidity, or freezing conditions.
Can I install Deck Crown in the winter?
Winter installation is not recommended unless temperatures consistently stay above 50°F on dry days. For most regions, plan and install in spring or early fall. Winter is an excellent time for planning, measuring, ordering materials, and inspecting your deck structure.
How far in advance should I plan my Deck Crown project?
Start planning 4–8 weeks ahead. For spring installation, begin in late winter or early spring. For fall/winter protection, inspect 6 weeks before first snow, clean and dry 4 weeks before, and install on a dry stretch of milder days.
Is fall a good time to install Deck Crown?
Yes. Early fall is one of the best times. Install before consistent cold and wet weather arrives so your deck is protected through winter. The patented drip-edge helps keep water out, reducing winter maintenance compared to bare wood.
Does Deck Crown require any special preparation timing?
Yes. Power wash and thoroughly clean the deck, then allow it to dry completely (usually 24–48 hours). Inspect for structural soundness, tighten fasteners, and address minor repairs before installation. Only apply over structurally sound wood.
Ready to Transform Your Deck?
The best time to start planning is now. Measure your deck, choose your color, and prepare for installation when temperatures climb above 50°F on a dry day. Whether you want a beautiful, maintenance-free surface for summer gatherings or reliable protection before winter, Deck Crown delivers an affordable, durable solution made in America.
Visit deck-crown.com to explore colors, use the roll calculator, view the DIY guide, or contact the team at 800.320.1841 (toll-free) or 330.668.2587. Located at 3489 Sawmill Road, Copley, Ohio 44321-1636.
Your improved deck is only a weekend away—once the timing is right.