How to Prepare Your Wooden Deck for Winter
A wooden deck takes a beating from November through March. Snow sits in the board gaps. Freeze-thaw cycles pry at every check and fastener. Ice melt salts stain and dry out the grain. Wet leaves trap moisture against the boards and invite mold. If you skip fall prep, you often pay for it in spring with gray wood, popped screws, and boards that need replacing.
Below is a complete winter-prep checklist for a bare wood deck — then a clear look at which of those jobs Deck Crown covering removes, and which ones you should still do even after the boards are covered.
Why winter is hard on wood decks
- Water in the grain. Wet boards freeze. Ice expands. That opens checks and splits.
- Standing snow and ice. Packed snow keeps wood wet for weeks.
- Sun on cold days. UV still breaks down lignin. That is why south-facing decks gray even in winter.
- De-icers. Rock salt and many ice melts draw moisture, stain, and chew at finishes.
- Debris. Leaves and pine needles hold water against the surface and between boards.
- Movement. Wood shrinks and swells. Fasteners work loose.
Deck Crown is a self-adhesive vinyl covering that bonds to structurally sound wood boards. It adds stain, mold, mildew, and fade resistance, and its patented drip edge is designed to keep water from getting between the covering and the board. That changes the winter job list — it does not make the deck invisible to weather.
The traditional winter-prep checklist
Do these steps on a dry day above about 50°F if you still have a bare or stained wood surface. Work from the house outward so you are not tracking debris onto a cleaned area.
1. Walk the structure first
Winter prep is wasted if the frame is failing. Check:
- Posts, beams, and joists for rot, especially where they meet the ground, ledger, or soil splash.
- The ledger board and flashing against the house. Water behind the ledger is a structural problem, not a cosmetic one.
- Railings, stairs, and balusters. Shake them. Tighten loose hardware.
- Soft spots in the walking surface. Probe suspect boards with a screwdriver. Soft wood should be replaced before any covering or sealer goes on.
Deck Crown does not eliminate this step. The covering is for boards that are already sound. Replace failed boards, tighten hardware, and fix flashing first.
2. Clear furniture, planters, and rugs
Lift everything off the deck. Outdoor rugs and planter saucers trap moisture and leave stains. Store cushions indoors. If a grill stays outside, put a cover on it and keep the grease tray empty so freeze-thaw does not split residue onto the boards.
Deck Crown still wants a clear deck for cleaning and snow removal. You can leave furniture out more easily because the surface resists stains better, but rugs and standing planters are still a bad idea all winter.
3. Sweep, then wash
Sweep leaves, acorns, and grit out of the gaps. Pay attention to the spots against the house, under railings, and at the bottom of stairs.
Wash the deck:
- Wet the boards.
- Apply a deck cleaner made for wood. Follow the label. Avoid harsh chlorine mixes that chew at lignin unless the product is made for decks.
- Scrub with a stiff brush along the grain.
- Rinse thoroughly. Dirty rinse water left in the gaps just moves the problem.
- Let the wood dry 24–48 hours, longer if the boards are shaded or the air is damp.
A light rinse is fine. A pressure washer on a wide fan tip, kept moving and held well off the surface, can help on a filthy deck. Too much pressure raises grain and drives water into the ends of the boards.
With Deck Crown: You still sweep. You do not need an annual chemical wood cleaning or a long dry-out before stain. A mild soap-and-water wash is enough for the vinyl surface. No open grain to scrub mildew out of.
4. Treat mildew and algae now
North-facing decks and boards under trees often show black spotting by late fall. Kill it before snow covers it. Use a wood-safe mildew cleaner, rinse, and dry. Sealing over live mildew locks the problem in.
With Deck Crown: The covering is made with additives for mold and mildew resistance. You are not treating raw wood every fall. Wipe growth off the surface if it appears in deep shade; you are not bleaching boards.
5. Sand splinters and failed finish
Knock down raised grain, splinters, and peeling stain. Feather the edges of old coating. Vacuum the dust. Bare wood that will be stained needs a sound surface or the new finish fails in a season.
With Deck Crown: Splinters become a non-issue on the walking surface because the vinyl covers the board. You do not sand for stain adhesion every fall. You still want a reasonably clean, dry, sound board before the covering is installed.
6. Seal or stain — the job most people skip
This is the core of traditional winter prep. A penetrating sealer or a quality semi-transparent stain is what keeps water out of the grain.
- Confirm the wood is dry. A simple test: sprinkle water. If it beads, leftover finish may still be there. If it darkens and soaks in, the wood is ready.
- Pick a product rated for decks, not a film-forming porch paint unless you are committed to that system.
- Coat board ends and cut edges. Those soak water first.
- Work one or two boards at a time so you keep a wet edge.
- Stay off the deck until the label’s dry time is over. Then give it a few dry days before snow.
In many climates this is an every-one-to-three-year job, not a one-time coat. Miss a year and winter water does the rest.
With Deck Crown: this step goes away on covered boards. You are not recoating stain before winter. The vinyl surface and drip edge are the weather barrier on the walking face. That is the largest time and cost saving on this list.
7. Check fasteners and board ends
Set popped nails or replace them with coated deck screws. Look at the ends of boards and stair treads. End grain drinks water. On a bare deck, an extra wipe of sealer on every cut end is worth the ten minutes.
With Deck Crown: The top face is covered. You should still glance at stairs, fascia, and any uncovered framing. Popped fasteners under a covering are a pre-install repair, not an annual stain chore.
8. Clear drainage under and around the deck
Rake leaves out from under the deck if you can reach them. Make sure downspouts dump away from posts. Grade that pitches water toward the framing will rot posts no matter what is on the boards.
Deck Crown does not change drainage under the deck. Keep doing this.
9. Plan for snow and ice
On bare wood:
- Use a plastic shovel. Metal edges gouge boards and peel stain.
- Avoid rock salt when you can. Calcium chloride or products labeled as deck-safe are kinder than sodium chloride, but any de-icer can mark wood and nearby plants.
- Do not chip ice with a metal scraper.
- Remove heavy, wet snow so the structure is not carrying extra load for weeks.
With Deck Crown: You still shovel heavy snow and you still avoid metal blades. The surface is built to resist stains and moisture, so stray de-icer and dirty slush are less likely to leave the gray blotches bare wood gets. You are not protecting a stain film. You are still responsible for snow load on the frame.
10. Cover or store what can trap moisture
Take up outdoor carpets. Empty flower boxes or lift them onto pot feet. If you use a deck cover tarp, do not pin a waterproof sheet tight to wet wood all winter — that creates a greenhouse and can make rot worse. Breathable covers, or no cover plus a protected walking surface, beat a sealed tarp over damp boards.
With Deck Crown: You do not need a winter tarp over the boards to save the finish. Keep furniture and pots from sitting in one wet footprint for three months.
What Deck Crown covering actually eliminates
| Winter-prep task | Bare wood deck | Deck with Deck Crown |
| Structural inspection | Required | Still required |
| Replace rotten boards | Required | Required before install; not an annual finish job |
| Deep wood cleaning and mildew treatment | Every fall | Mostly eliminated; mild wash as needed |
| Sanding splinters and failed stain | Often every year | Eliminated on the covered walking surface |
| Sealing or staining before winter | Core annual / biannual job | Eliminated on covered boards |
| Sealing board ends and cut edges | Recommended every coat | Covered face no longer needs stain |
| Worrying about ice-melt stains on finish | High | Greatly reduced; surface resists stains |
| Splinters after freeze-thaw | Common | Walking surface is vinyl, not open grain |
| Clearing debris and shoveling snow | Required | Still required |
| Drainage at posts, ledger, and under the deck | Required | Still required |
How to use Deck Crown as winter protection
If the deck is structurally sound and you want this to be the last fall you spend staining, install before consistent cold and wet weather. Adhesive products want a clean, dry board and milder temperatures than a January afternoon.
- Inspect and repair the frame, stairs, and railings.
- Replace any board that is soft, badly cupped, or rotten.
- Clean the boards and let them dry completely (typically 24–48 hours).
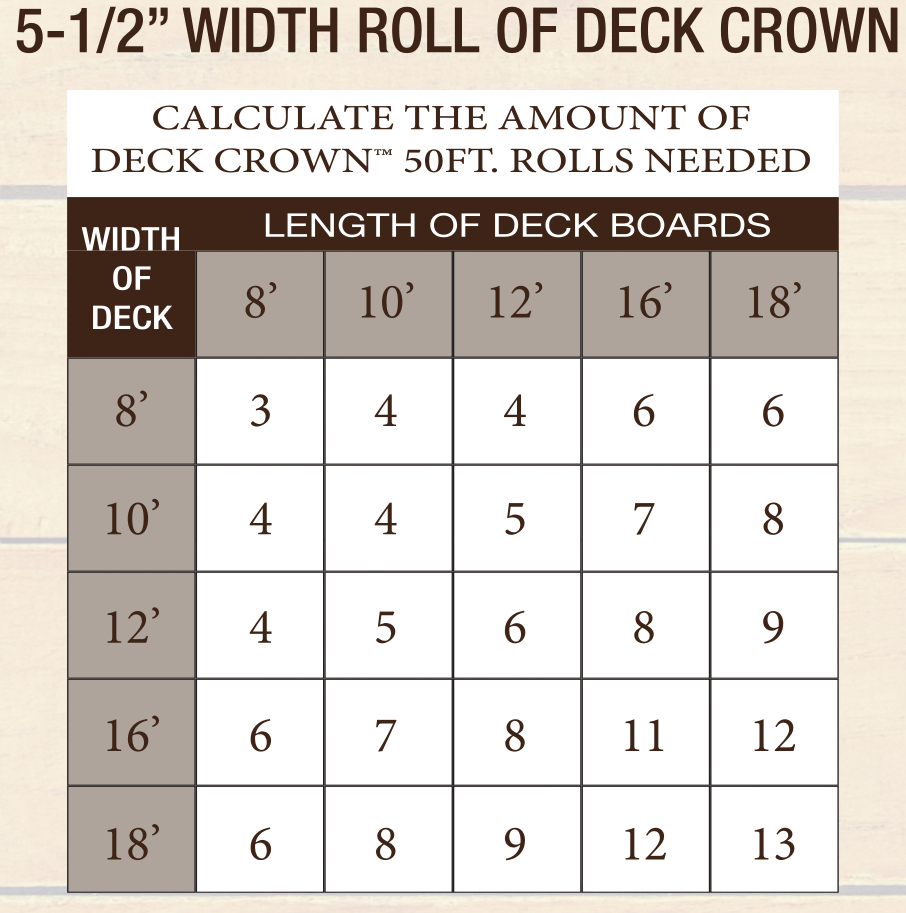
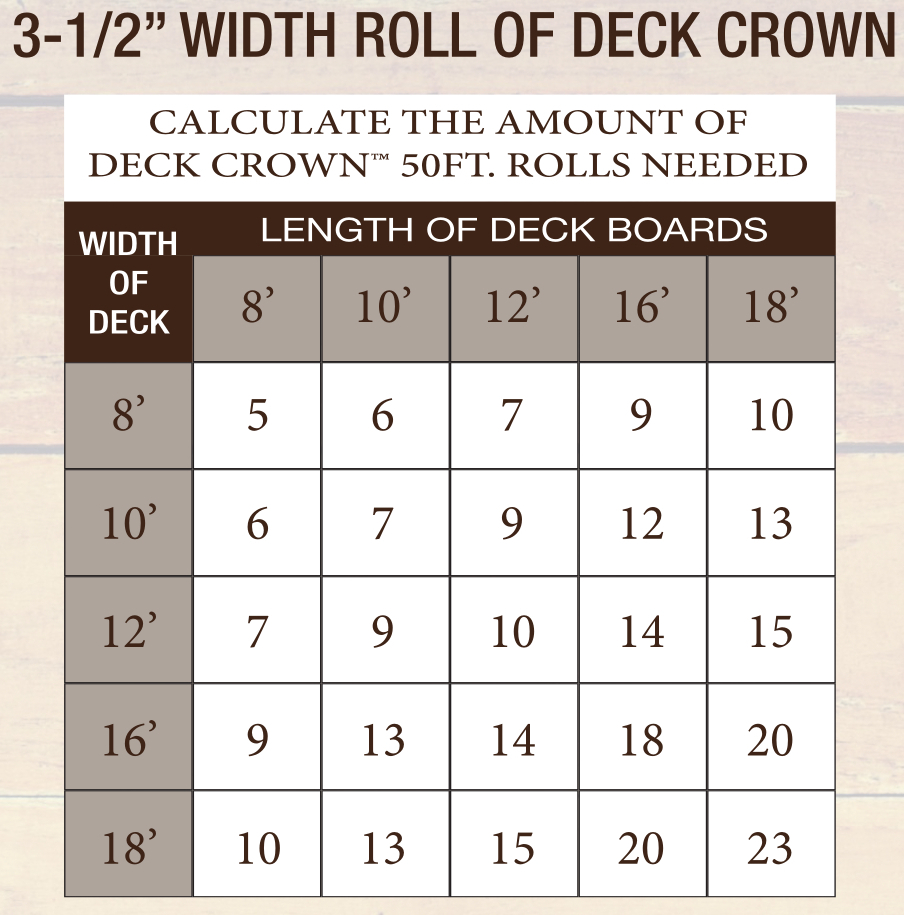
- Measure board length and width and order the Deck Crown color that matches your house — Cape Cod, Cedar, Red Wood, Stone, Timber, or Weathered.
- Cut pieces to length, peel the backing, and press the covering onto each sound board. The drip edge is there to shed water so it is less likely to sit between the vinyl and the wood.
Once it is down, fall prep shrinks to: inspect the structure, sweep, wash if dirty, move rugs and pots, and shovel snow with a plastic shovel.
A simple pre-winter schedule
Six weeks before first snow — inspect structure; decide whether you will stain one more time or cover the boards.
Four weeks before — clean and dry. Install Deck Crown on a dry stretch of days, or apply stain if you are staying with bare wood.
Two weeks before — store cushions, lift planters, clear gutters that dump onto the deck.
All winter — keep heavy snow moved, use a plastic shovel, and stay off ice rather than attacking it with metal.
First thaw — walk the deck again. Look at railings, stairs, and anything the covering does not protect: fascia, posts, and the ledger.
The honest bottom line
Winter prep on bare wood is mostly water control: clean, dry, seal, and keep debris off. Deck Crown takes over the sealing and surface-protection half of that list. It will not hold up a rotten joist, dry out a buried post, or shovel the deck for you.
If your boards are solid and you are tired of the annual stain-and-pray routine, covering them before winter is the step that removes the most labor. If the frame is tired, fix that first — then put the covering on wood that is worth protecting.
See colors and install notes at deck-crown.com, or start with the season-ready guide on the Deck Crown blog.